Showing posts with label how to. Show all posts

Saturday, March 26, 2016

Big Thread Spool

I got a cable spool from a guy laying cable in our backyard...and,

because I love thread so much... I decided to transform it by making a spool label. My inspiration is this spool that I used for a cabinet pull on my notion cabinet.

 
So, I cut a big circle from a piece of wallpaper.....not the pre-pasted kind. I used the back of the wallpaper. Wallpaper is very strong and the back of it takes pencil and color really well. It was also the right color.

I drew my design and painted it with craft paint. I did this in an evening...it went very quickly.

I used tan Rit dye...just brushed it on...to color the spool. When that dried, I glued the thread label to the top of the spool. For the "thread" I wrapped paper ribbon around the spool....I had yards of paper ribbon that required a storage solution..

My dress form had been standing on the spool...so, I decided to use the spool as a stand for my dress form. All I had to do was to pull the dress form stand off of the pole, put the pole through the spool and then put the stand back on under the spool.

TA DA!

One might think this project is finished...but that was before Lisa saw it....I'll be making hers next. She wants it in black.


Tuesday, March 1, 2016

Good Morning Turtles Quilt Part 1 of 2

Good Morning Turtles is a little quilt that began with a hand marbled fabric from Quilter's Treasures. I designed this quilt with flower and turtle motifs that fit into the grass-like fabric design.

I was playing with several technique ideas. I want to share some of these things with you.

My first idea was to thread paint a base and then built up a design with fabric fused felt elements. Here are photos of the progress of the flower motifs.

I stitched the flower base. The fabric I used is a pretty yellow dot cotton because the color of the fabric will show through the stitching. I stitched some crosshatching in the middle of the flower to keep the motif from puckering.

Flower elements are made from fusing print fabrics to wool felt. I used Wonder Under fusible web.Then, I cut out the shapes.

Next, I glued the shapes to the base using a really good fabric glue. I used the same techniques for the turtles.

In my next post, I'll show you the next steps I took in the making of this quilt.


Wednesday, April 21, 2010

Journal Workshop

I have been making little journals to use when I'm coming up with ideas or for designing while on the road. I thought I would share with you, the steps to make these. The great thing about them is that they are not fancy- so you don't have to worry about messing up an expensive one. You can take pages out and add new ones easily. I also used all kinds of papers including leftover school paper and I recycled some things- very green!
 

 The finished journal is 5 1/2 inches by 8 1/2 inches
which is half the size of copy paper. I have a nice paper cutter, so I can cut stacks at a time. I use a mix of everything- graph paper, tracing paper, craft and copy papers (my husband was a printer, so I have lots of leftovers from his work).


  I used old file dividers as the top and bottom covers- they are stiff and have a nice matte gloss finish.( I saved the letter tabs to use in another project).

So, cut papers until you have a nice stack about 1/2 inch thick.

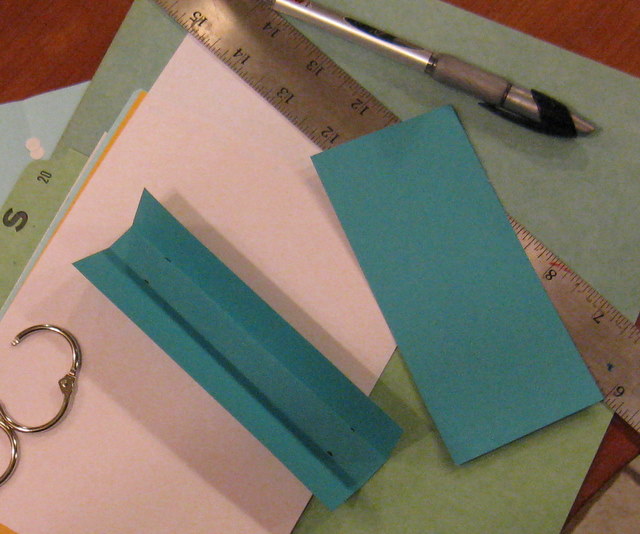
 Then, make a header- I used two pieces of turquoise blue  heavy card-stock paper for double the strength, cut them 5 1/2 inches long and 3 inches wide and glued them together. Fold the header so that it becomes the spine of the journal with 1/2 inch central fold. I used a hole punch to put two holes on each side of the header- be sure they line up. Then, I used the header as a guide as I punched holes in the covers and papers- a few at time.

 Then I used 1 1/4 inch diameter binder rings to close them up. I glued the headers to the covers at this point.
I like to decorate the front of the journals with stitch samples, old UFO's, a cool fabric, etc.I also label some of them on the spine to keep track of some of the work I'm putting inside.